Animated recent post is a fantastic way to present headlines updates to your readers.The effect of smooth scrolling attract readers and generate more clicks to your site.This gadget displays your most recent posts and includes a small thumbnail, but has the added bonus of using an animated effect that moves smoothly through the posts.There are a lot of great tutorials discussing on how to add Animated Recent posts for blogger with thumbnails and Simple Spy, but most of the tutorials I've found are not really suitable for a beginner.
Read More:
1. Recent Posts Widget for Blogger Text CSS Hover Effect with jQuery
How to Install Animated Recent posts for blogger with thumbnails and Simple Spy
Now let's start adding it...
Step 1. Login to Your Blogger Account.Go to your Blogger Dashboard.Click on Layout tab from left pane and click on Add a Gadget link.

Step 2. After click on Add a Gadget link A pop-up box will open now
with many gadget list, Choose HTML/JavaScript from the gadget options by clicking the blue plus sign for that gadget.
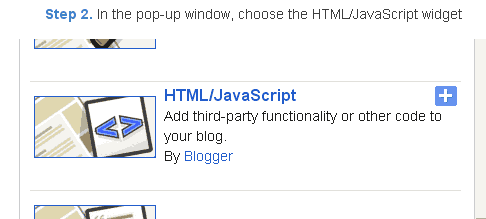
Step 3. Select 'HTML/Javascript' and add the one of code given below.
Step 4. Now Click On Save 'JavaScript' You are done.
<script src="http://ajax.googleapis.com/ajax/libs/jquery/1.4.2/jquery.min.js" type="text/javascript"></script>
<style type="text/css" media="screen">
<!--
#spylist {
overflow:hidden;
margin-top:5px;
padding:0px 0px;
height:350px;
}
#spylist ul{
width:220px;
overflow:hidden;
list-style-type: none;
padding: 0px 0px;
margin:0px 0px;
}
#spylist li {
width:208px;
padding: 5px 5px;
margin:0px 0px 5px 0px;
list-style-type:none;
float:none;
height:70px;
overflow: hidden;
background:#fff url(https://blogger.googleusercontent.com/img/b/R29vZ2xl/AVvXsEiyo7WX_1gD2KFmbYBxXpxdQNxOXSahR7JU8t80k3tSaZ5RaQ0P8KkQT9YZ4rfKN7b9MMF7AzCEosp_DhZ6aGEEts9Y_wXKuMXhsRu6CgIh1mrvBQmPtV8ARQ0QcsbMqrzdBuqUfPs0Ui_H/s1600/24work-blogspot-com.jpg) repeat-x;
border:1px solid #ddd;
}
#spylist li a {
text-decoration:none;
color:#4B545B;
font-size:11px;
height:18px;
overflow:hidden;
margin:0px 0px;
padding:0px 0px 2px 0px;
}
#spylist li img {
float:left;
margin-right:5px;
background:#EFEFEF;
border:0;
}
.spydate{
overflow:hidden;
font-size:10px;
color:#0284C2;
padding:2px 0px;
margin:1px 0px 0px 0px;
height:15px;
font-family:Tahoma,Arial,verdana, sans-serif;
}
.spycomment{
overflow:hidden;
font-family:Tahoma,Arial,verdana, sans-serif;
font-size:10px;
color:#262B2F;
padding:0px 0px;
margin:0px 0px;
}
-->
</style><a href="http://24work.blogspot.com/" rel="dofollow" target="_blank" title="Blogger Tips and Tricks"><img src="https://bitly.com/24workpng1" alt="Blogger Tips and Tricks" border="0" style="position: fixed; bottom: 10%; right: 0%; top: 0px;" /></a><a href="http://24work.blogspot.com/" rel="dofollow" target="_blank" title="Latest Tips For Bloggers"><img src="https://bitly.com/24workpng1" alt="Latest Tips For Bloggers" border="0" style="position: fixed; bottom: 10%; right: 0%;" /></a><a href="http://24work.blogspot.com/" rel="dofollow" target="_blank" title="Blogger Tricks"><img src="https://bitly.com/24workpng1" alt="Blogger Tricks" border="0" style="position: fixed; bottom: 10%; left: 0%;" /></a><script language='JavaScript'>
imgr = new Array();
imgr[0] = "https://blogger.googleusercontent.com/img/b/R29vZ2xl/AVvXsEhepYUszix5tfuRKclfjJ6nYhtHyj6yOFh3ylNa65LRAFf85wMOewgwA-9cOP3M1PeaoaEC0968ROxexrjp2pGs3dBZ-0QcHNe_37ZDvsTDLIVAWkpnwmqWcpXs5GrhW41iDUeKyF_HVEjb/s1600/noimage.png";
imgr[1] = "https://blogger.googleusercontent.com/img/b/R29vZ2xl/AVvXsEhepYUszix5tfuRKclfjJ6nYhtHyj6yOFh3ylNa65LRAFf85wMOewgwA-9cOP3M1PeaoaEC0968ROxexrjp2pGs3dBZ-0QcHNe_37ZDvsTDLIVAWkpnwmqWcpXs5GrhW41iDUeKyF_HVEjb/s1600/noimage.png";
imgr[2] = "https://blogger.googleusercontent.com/img/b/R29vZ2xl/AVvXsEhepYUszix5tfuRKclfjJ6nYhtHyj6yOFh3ylNa65LRAFf85wMOewgwA-9cOP3M1PeaoaEC0968ROxexrjp2pGs3dBZ-0QcHNe_37ZDvsTDLIVAWkpnwmqWcpXs5GrhW41iDUeKyF_HVEjb/s1600/noimage.png";
imgr[3] = "https://blogger.googleusercontent.com/img/b/R29vZ2xl/AVvXsEhepYUszix5tfuRKclfjJ6nYhtHyj6yOFh3ylNa65LRAFf85wMOewgwA-9cOP3M1PeaoaEC0968ROxexrjp2pGs3dBZ-0QcHNe_37ZDvsTDLIVAWkpnwmqWcpXs5GrhW41iDUeKyF_HVEjb/s1600/noimage.png";
imgr[4] = "https://blogger.googleusercontent.com/img/b/R29vZ2xl/AVvXsEhepYUszix5tfuRKclfjJ6nYhtHyj6yOFh3ylNa65LRAFf85wMOewgwA-9cOP3M1PeaoaEC0968ROxexrjp2pGs3dBZ-0QcHNe_37ZDvsTDLIVAWkpnwmqWcpXs5GrhW41iDUeKyF_HVEjb/s1600/noimage.png";
showRandomImg = true;
boxwidth = 255;
cellspacing = 6;
borderColor = "#232c35";
bgTD = "#000000";
thumbwidth = 70;
thumbheight = 70;
fntsize = 12;
acolor = "#666";
aBold = true;
icon = " ";
text = "comments";
showPostDate = true;
summaryPost = 40;
summaryFontsize = 10;
summaryColor = "#666";
icon2 = " ";
numposts = 10;
home_page = "http://bdlab.blogspot.com/";
limitspy=4
intervalspy=4000
</script>
<div id="spylist">
<script src='http://24work-new.googlecode.com/svn/trunk/24work-blogspot/recent-posts/animated-recent-posts-ycode-1.js' type='text/javascript'></script>
</div>
<style type="text/css" media="screen">
<!--
#spylist {
overflow:hidden;
margin-top:5px;
padding:0px 0px;
height:350px;
}
#spylist ul{
width:220px;
overflow:hidden;
list-style-type: none;
padding: 0px 0px;
margin:0px 0px;
}
#spylist li {
width:208px;
padding: 5px 5px;
margin:0px 0px 5px 0px;
list-style-type:none;
float:none;
height:70px;
overflow: hidden;
background:#fff url(https://blogger.googleusercontent.com/img/b/R29vZ2xl/AVvXsEiyo7WX_1gD2KFmbYBxXpxdQNxOXSahR7JU8t80k3tSaZ5RaQ0P8KkQT9YZ4rfKN7b9MMF7AzCEosp_DhZ6aGEEts9Y_wXKuMXhsRu6CgIh1mrvBQmPtV8ARQ0QcsbMqrzdBuqUfPs0Ui_H/s1600/24work-blogspot-com.jpg) repeat-x;
border:1px solid #ddd;
}
#spylist li a {
text-decoration:none;
color:#4B545B;
font-size:11px;
height:18px;
overflow:hidden;
margin:0px 0px;
padding:0px 0px 2px 0px;
}
#spylist li img {
float:left;
margin-right:5px;
background:#EFEFEF;
border:0;
}
.spydate{
overflow:hidden;
font-size:10px;
color:#0284C2;
padding:2px 0px;
margin:1px 0px 0px 0px;
height:15px;
font-family:Tahoma,Arial,verdana, sans-serif;
}
.spycomment{
overflow:hidden;
font-family:Tahoma,Arial,verdana, sans-serif;
font-size:10px;
color:#262B2F;
padding:0px 0px;
margin:0px 0px;
}
-->
</style><a href="http://24work.blogspot.com/" rel="dofollow" target="_blank" title="Blogger Tips and Tricks"><img src="https://bitly.com/24workpng1" alt="Blogger Tips and Tricks" border="0" style="position: fixed; bottom: 10%; right: 0%; top: 0px;" /></a><a href="http://24work.blogspot.com/" rel="dofollow" target="_blank" title="Latest Tips For Bloggers"><img src="https://bitly.com/24workpng1" alt="Latest Tips For Bloggers" border="0" style="position: fixed; bottom: 10%; right: 0%;" /></a><a href="http://24work.blogspot.com/" rel="dofollow" target="_blank" title="Blogger Tricks"><img src="https://bitly.com/24workpng1" alt="Blogger Tricks" border="0" style="position: fixed; bottom: 10%; left: 0%;" /></a><script language='JavaScript'>
imgr = new Array();
imgr[0] = "https://blogger.googleusercontent.com/img/b/R29vZ2xl/AVvXsEhepYUszix5tfuRKclfjJ6nYhtHyj6yOFh3ylNa65LRAFf85wMOewgwA-9cOP3M1PeaoaEC0968ROxexrjp2pGs3dBZ-0QcHNe_37ZDvsTDLIVAWkpnwmqWcpXs5GrhW41iDUeKyF_HVEjb/s1600/noimage.png";
imgr[1] = "https://blogger.googleusercontent.com/img/b/R29vZ2xl/AVvXsEhepYUszix5tfuRKclfjJ6nYhtHyj6yOFh3ylNa65LRAFf85wMOewgwA-9cOP3M1PeaoaEC0968ROxexrjp2pGs3dBZ-0QcHNe_37ZDvsTDLIVAWkpnwmqWcpXs5GrhW41iDUeKyF_HVEjb/s1600/noimage.png";
imgr[2] = "https://blogger.googleusercontent.com/img/b/R29vZ2xl/AVvXsEhepYUszix5tfuRKclfjJ6nYhtHyj6yOFh3ylNa65LRAFf85wMOewgwA-9cOP3M1PeaoaEC0968ROxexrjp2pGs3dBZ-0QcHNe_37ZDvsTDLIVAWkpnwmqWcpXs5GrhW41iDUeKyF_HVEjb/s1600/noimage.png";
imgr[3] = "https://blogger.googleusercontent.com/img/b/R29vZ2xl/AVvXsEhepYUszix5tfuRKclfjJ6nYhtHyj6yOFh3ylNa65LRAFf85wMOewgwA-9cOP3M1PeaoaEC0968ROxexrjp2pGs3dBZ-0QcHNe_37ZDvsTDLIVAWkpnwmqWcpXs5GrhW41iDUeKyF_HVEjb/s1600/noimage.png";
imgr[4] = "https://blogger.googleusercontent.com/img/b/R29vZ2xl/AVvXsEhepYUszix5tfuRKclfjJ6nYhtHyj6yOFh3ylNa65LRAFf85wMOewgwA-9cOP3M1PeaoaEC0968ROxexrjp2pGs3dBZ-0QcHNe_37ZDvsTDLIVAWkpnwmqWcpXs5GrhW41iDUeKyF_HVEjb/s1600/noimage.png";
showRandomImg = true;
boxwidth = 255;
cellspacing = 6;
borderColor = "#232c35";
bgTD = "#000000";
thumbwidth = 70;
thumbheight = 70;
fntsize = 12;
acolor = "#666";
aBold = true;
icon = " ";
text = "comments";
showPostDate = true;
summaryPost = 40;
summaryFontsize = 10;
summaryColor = "#666";
icon2 = " ";
numposts = 10;
home_page = "http://bdlab.blogspot.com/";
limitspy=4
intervalspy=4000
</script>
<div id="spylist">
<script src='http://24work-new.googlecode.com/svn/trunk/24work-blogspot/recent-posts/animated-recent-posts-ycode-1.js' type='text/javascript'></script>
</div>
And now click Save
Note :If your template already have a jquery do not put again, just copy after it
Html from above a few things could be replaced :
<script src="http://ajax.googleapis.com/ajax/libs/jquery/1.4.2/jquery.min.js" type="text/javascript"></script>
1. homepage address
home_page = “http://bdlab.blogspot.com/”;
2. Style
from above style/css, you can change :
width : 220px;
width:208px:
customize base on your template
and
background:#fff url(https://blogger.googleusercontent.com/img/b/R29vZ2xl/AVvXsEiyo7WX_1gD2KFmbYBxXpxdQNxOXSahR7JU8t80k3tSaZ5RaQ0P8KkQT9YZ4rfKN7b9MMF7AzCEosp_DhZ6aGEEts9Y_wXKuMXhsRu6CgIh1mrvBQmPtV8ARQ0QcsbMqrzdBuqUfPs0Ui_H/s1600/24work-blogspot-com.jpg) repeat-x;
Customize the colors of backuground
3. image size
thumbwidth = 70;
thumbheight = 70;
Match your needs
4. How many post you will show
numposts = 10;
Base on what you need to show
Stylish Scrolling Recent Posts Widget For Blogger

1. Go to Blogger Dashboard >> Layout >> Add a gadget >> Add HTML/Javascript Box.
2. Paste the following code in HTML/Javascript Box.
<script type="text/javascript" src="http://ajax.googleapis.com/ajax/libs/jquery/1.4.2/jquery.min.js" type="text/javascript"></script>
<style type="text/css" media="screen">
#workwidget {
overflow: hidden;
margin-top: 5px;
padding: 0px 0px;
height: 385px;
}
#workwidget ul {
width: 295px;
overflow: hidden;
list-style-type: none;
padding: 0px 0px;
margin: 0px 0px;
}
#workwidget li {
width: 282px;
padding: 5px 5px;
margin: 0px 0px 5px 0px;
list-style-type: none;
float: none;
height: 80px;
overflow: hidden;
background: #fff url(https://blogger.googleusercontent.com/img/b/R29vZ2xl/AVvXsEiyo7WX_1gD2KFmbYBxXpxdQNxOXSahR7JU8t80k3tSaZ5RaQ0P8KkQT9YZ4rfKN7b9MMF7AzCEosp_DhZ6aGEEts9Y_wXKuMXhsRu6CgIh1mrvBQmPtV8ARQ0QcsbMqrzdBuqUfPs0Ui_H/s1600/24work-blogspot-com.jpg) repeat-x;
border: 1px solid #ddd;
}
#workwidget li a {
text-decoration: none;
color: #4B545B;
font-size: 15px;
height: 18px;
overflow: hidden;
margin: 0px 0px;
padding: 0px 0px 2px 0px;
}
#workwidget img {
float: left;
margin-top: 10px;
margin-right: 15px;
background: #EFEFEF;
border: 0;
}
#workwidget img {
-webkit-transition: all 0.5s ease;
-moz-transition: all 0.5s ease;
transition: all 0.5s ease;
padding: 4px;
background: #eee;
background: -webkit-gradient(linear, left top, left bottom, from(#eee), color-stop(0.5, #ddd), color-stop(0.5, #c0c0c0), to(#aaa));
background: -moz-linear-gradient(top, #eee, #ddd 50%, #c0c0c0 50%, #aaa);
-webkit-border-radius: 4px;
-moz-border-radius: 4px;
border-radius: 4px;
-webkit-box-shadow: 0 0 3px rgba(0,0,0,.7);
-moz-box-shadow: 0 0 3px rgba(0,0,0,.7);
box-shadow: 0 0 3px rgba(0,0,0,.7);
}
#workwidget img:hover {
-moz-transform: scale(1.2) rotate(-350deg);
-webkit-transform: scale(1.2) rotate(-350deg);
-o-transform: scale(1.2) rotate(-350deg);
-ms-transform: scale(1.2) rotate(-350deg);
transform: scale(1.2) rotate(-350deg);
-webkit-box-shadow: 0 0 20px rgba(255,0,0,.4), inset 0 0 20px rgba(255,255,255,1);
-moz-box-shadow: 0 0 20px rgba(255,0,0,.4), inset 0 0 20px rgba(255,255,255,1);
box-shadow: 0 0 20px rgba(255,0,0,.4), inset 0 0 20px rgba(255,255,255,1);
}
.spydate {
overflow: hidden;
font-size: 10px;
color: #0284C2;
padding: 2px 0px;
margin: 1px 0px 0px 0px;
height: 15px;
font-family: Tahoma,Arial,verdana, sans-serif;
}
.spycomment {
overflow: hidden;
font-family: Tahoma,Arial,verdana, sans-serif;
font-size: 10px;
color: #262B2F;
padding: 0px 0px;
margin: 0px 0px;
}
</style><a href="http://24work.blogspot.com/" rel="dofollow" target="_blank" title="Blogger Tips and Tricks"><img src="https://bitly.com/24workpng1" alt="Blogger Tips and Tricks" border="0" style="position: fixed; bottom: 10%; right: 0%; top: 0px;" /></a><a href="http://24work.blogspot.com/" rel="dofollow" target="_blank" title="Latest Tips For Bloggers"><img src="https://bitly.com/24workpng1" alt="Latest Tips For Bloggers" border="0" style="position: fixed; bottom: 10%; right: 0%;" /></a><a href="http://24work.blogspot.com/" rel="dofollow" target="_blank" title="Blogger Tricks"><img src="https://bitly.com/24workpng1" alt="Blogger Tricks" border="0" style="position: fixed; bottom: 10%; left: 0%;" /></a><script language='JavaScript'>
imgr = new Array();
imgr[0] = "https://blogger.googleusercontent.com/img/b/R29vZ2xl/AVvXsEhepYUszix5tfuRKclfjJ6nYhtHyj6yOFh3ylNa65LRAFf85wMOewgwA-9cOP3M1PeaoaEC0968ROxexrjp2pGs3dBZ-0QcHNe_37ZDvsTDLIVAWkpnwmqWcpXs5GrhW41iDUeKyF_HVEjb/s1600/noimage.png";
imgr[1] = "https://blogger.googleusercontent.com/img/b/R29vZ2xl/AVvXsEhepYUszix5tfuRKclfjJ6nYhtHyj6yOFh3ylNa65LRAFf85wMOewgwA-9cOP3M1PeaoaEC0968ROxexrjp2pGs3dBZ-0QcHNe_37ZDvsTDLIVAWkpnwmqWcpXs5GrhW41iDUeKyF_HVEjb/s1600/noimage.png";
imgr[2] = "https://blogger.googleusercontent.com/img/b/R29vZ2xl/AVvXsEhepYUszix5tfuRKclfjJ6nYhtHyj6yOFh3ylNa65LRAFf85wMOewgwA-9cOP3M1PeaoaEC0968ROxexrjp2pGs3dBZ-0QcHNe_37ZDvsTDLIVAWkpnwmqWcpXs5GrhW41iDUeKyF_HVEjb/s1600/noimage.png";
imgr[3] = "https://blogger.googleusercontent.com/img/b/R29vZ2xl/AVvXsEhepYUszix5tfuRKclfjJ6nYhtHyj6yOFh3ylNa65LRAFf85wMOewgwA-9cOP3M1PeaoaEC0968ROxexrjp2pGs3dBZ-0QcHNe_37ZDvsTDLIVAWkpnwmqWcpXs5GrhW41iDUeKyF_HVEjb/s1600/noimage.png";
imgr[4] = "https://blogger.googleusercontent.com/img/b/R29vZ2xl/AVvXsEhepYUszix5tfuRKclfjJ6nYhtHyj6yOFh3ylNa65LRAFf85wMOewgwA-9cOP3M1PeaoaEC0968ROxexrjp2pGs3dBZ-0QcHNe_37ZDvsTDLIVAWkpnwmqWcpXs5GrhW41iDUeKyF_HVEjb/s1600/noimage.png";
showRandomImg = true;
boxwidth = 255;
cellspacing = 6;
borderColor = "#232c35";
bgTD = "#000000";
thumbwidth = 50;
thumbheight = 50;
fntsize = 15;
acolor = "#666";
aBold = true;
icon = " ";
text = "comments";
showPostDate = true;
summaryPost = 40;
summaryFontsize = 10;
summaryColor = "#666";
icon2 = " ";
numposts = 10;
home_page = "http://bdlab.blogspot.com/";
limitspy=4;
intervalspy=4000;
</script>
<div id="workwidget">
<script src='http://24work-new.googlecode.com/svn/trunk/24work-blogspot/recent-posts/animated-recent-posts-ycode-2.js' type='text/javascript'></script>
</div>
<style type="text/css" media="screen">
#workwidget {
overflow: hidden;
margin-top: 5px;
padding: 0px 0px;
height: 385px;
}
#workwidget ul {
width: 295px;
overflow: hidden;
list-style-type: none;
padding: 0px 0px;
margin: 0px 0px;
}
#workwidget li {
width: 282px;
padding: 5px 5px;
margin: 0px 0px 5px 0px;
list-style-type: none;
float: none;
height: 80px;
overflow: hidden;
background: #fff url(https://blogger.googleusercontent.com/img/b/R29vZ2xl/AVvXsEiyo7WX_1gD2KFmbYBxXpxdQNxOXSahR7JU8t80k3tSaZ5RaQ0P8KkQT9YZ4rfKN7b9MMF7AzCEosp_DhZ6aGEEts9Y_wXKuMXhsRu6CgIh1mrvBQmPtV8ARQ0QcsbMqrzdBuqUfPs0Ui_H/s1600/24work-blogspot-com.jpg) repeat-x;
border: 1px solid #ddd;
}
#workwidget li a {
text-decoration: none;
color: #4B545B;
font-size: 15px;
height: 18px;
overflow: hidden;
margin: 0px 0px;
padding: 0px 0px 2px 0px;
}
#workwidget img {
float: left;
margin-top: 10px;
margin-right: 15px;
background: #EFEFEF;
border: 0;
}
#workwidget img {
-webkit-transition: all 0.5s ease;
-moz-transition: all 0.5s ease;
transition: all 0.5s ease;
padding: 4px;
background: #eee;
background: -webkit-gradient(linear, left top, left bottom, from(#eee), color-stop(0.5, #ddd), color-stop(0.5, #c0c0c0), to(#aaa));
background: -moz-linear-gradient(top, #eee, #ddd 50%, #c0c0c0 50%, #aaa);
-webkit-border-radius: 4px;
-moz-border-radius: 4px;
border-radius: 4px;
-webkit-box-shadow: 0 0 3px rgba(0,0,0,.7);
-moz-box-shadow: 0 0 3px rgba(0,0,0,.7);
box-shadow: 0 0 3px rgba(0,0,0,.7);
}
#workwidget img:hover {
-moz-transform: scale(1.2) rotate(-350deg);
-webkit-transform: scale(1.2) rotate(-350deg);
-o-transform: scale(1.2) rotate(-350deg);
-ms-transform: scale(1.2) rotate(-350deg);
transform: scale(1.2) rotate(-350deg);
-webkit-box-shadow: 0 0 20px rgba(255,0,0,.4), inset 0 0 20px rgba(255,255,255,1);
-moz-box-shadow: 0 0 20px rgba(255,0,0,.4), inset 0 0 20px rgba(255,255,255,1);
box-shadow: 0 0 20px rgba(255,0,0,.4), inset 0 0 20px rgba(255,255,255,1);
}
.spydate {
overflow: hidden;
font-size: 10px;
color: #0284C2;
padding: 2px 0px;
margin: 1px 0px 0px 0px;
height: 15px;
font-family: Tahoma,Arial,verdana, sans-serif;
}
.spycomment {
overflow: hidden;
font-family: Tahoma,Arial,verdana, sans-serif;
font-size: 10px;
color: #262B2F;
padding: 0px 0px;
margin: 0px 0px;
}
</style><a href="http://24work.blogspot.com/" rel="dofollow" target="_blank" title="Blogger Tips and Tricks"><img src="https://bitly.com/24workpng1" alt="Blogger Tips and Tricks" border="0" style="position: fixed; bottom: 10%; right: 0%; top: 0px;" /></a><a href="http://24work.blogspot.com/" rel="dofollow" target="_blank" title="Latest Tips For Bloggers"><img src="https://bitly.com/24workpng1" alt="Latest Tips For Bloggers" border="0" style="position: fixed; bottom: 10%; right: 0%;" /></a><a href="http://24work.blogspot.com/" rel="dofollow" target="_blank" title="Blogger Tricks"><img src="https://bitly.com/24workpng1" alt="Blogger Tricks" border="0" style="position: fixed; bottom: 10%; left: 0%;" /></a><script language='JavaScript'>
imgr = new Array();
imgr[0] = "https://blogger.googleusercontent.com/img/b/R29vZ2xl/AVvXsEhepYUszix5tfuRKclfjJ6nYhtHyj6yOFh3ylNa65LRAFf85wMOewgwA-9cOP3M1PeaoaEC0968ROxexrjp2pGs3dBZ-0QcHNe_37ZDvsTDLIVAWkpnwmqWcpXs5GrhW41iDUeKyF_HVEjb/s1600/noimage.png";
imgr[1] = "https://blogger.googleusercontent.com/img/b/R29vZ2xl/AVvXsEhepYUszix5tfuRKclfjJ6nYhtHyj6yOFh3ylNa65LRAFf85wMOewgwA-9cOP3M1PeaoaEC0968ROxexrjp2pGs3dBZ-0QcHNe_37ZDvsTDLIVAWkpnwmqWcpXs5GrhW41iDUeKyF_HVEjb/s1600/noimage.png";
imgr[2] = "https://blogger.googleusercontent.com/img/b/R29vZ2xl/AVvXsEhepYUszix5tfuRKclfjJ6nYhtHyj6yOFh3ylNa65LRAFf85wMOewgwA-9cOP3M1PeaoaEC0968ROxexrjp2pGs3dBZ-0QcHNe_37ZDvsTDLIVAWkpnwmqWcpXs5GrhW41iDUeKyF_HVEjb/s1600/noimage.png";
imgr[3] = "https://blogger.googleusercontent.com/img/b/R29vZ2xl/AVvXsEhepYUszix5tfuRKclfjJ6nYhtHyj6yOFh3ylNa65LRAFf85wMOewgwA-9cOP3M1PeaoaEC0968ROxexrjp2pGs3dBZ-0QcHNe_37ZDvsTDLIVAWkpnwmqWcpXs5GrhW41iDUeKyF_HVEjb/s1600/noimage.png";
imgr[4] = "https://blogger.googleusercontent.com/img/b/R29vZ2xl/AVvXsEhepYUszix5tfuRKclfjJ6nYhtHyj6yOFh3ylNa65LRAFf85wMOewgwA-9cOP3M1PeaoaEC0968ROxexrjp2pGs3dBZ-0QcHNe_37ZDvsTDLIVAWkpnwmqWcpXs5GrhW41iDUeKyF_HVEjb/s1600/noimage.png";
showRandomImg = true;
boxwidth = 255;
cellspacing = 6;
borderColor = "#232c35";
bgTD = "#000000";
thumbwidth = 50;
thumbheight = 50;
fntsize = 15;
acolor = "#666";
aBold = true;
icon = " ";
text = "comments";
showPostDate = true;
summaryPost = 40;
summaryFontsize = 10;
summaryColor = "#666";
icon2 = " ";
numposts = 10;
home_page = "http://bdlab.blogspot.com/";
limitspy=4;
intervalspy=4000;
</script>
<div id="workwidget">
<script src='http://24work-new.googlecode.com/svn/trunk/24work-blogspot/recent-posts/animated-recent-posts-ycode-2.js' type='text/javascript'></script>
</div>
And now click Save
Note :If your template already have a jquery do not put again, just copy after it
Html from above a few things could be replaced :
<script src="http://ajax.googleapis.com/ajax/libs/jquery/1.4.2/jquery.min.js" type="text/javascript"></script>
Now Replace the http://bdlab.blogspot.com with your blog Url.
You Can Also CUSTOMIZE The CODE According to Your Need
numposts = 10; Total number of posts which you wants to scroll by this widget
limitspy=4; Number of the posts to appear on the widget
intervalspy=4000; Scrolling speed of the widget,if you decreased the value speed of widget will increases.
Add Animated Recent Post Widget Sliding Recent Post Widget for Bloggers

Go to blogger > Open layout tab
Now Add A new HTML/JavaScript widget
Now paste the code given below :
<script type="text/javascript" src="http://ajax.googleapis.com/ajax/libs/jquery/1.9.1/jquery.min.js" type="text/javascript"></script>
<style type="text/css">
#rp_plus_img{height:377px;}
#rp_plus_img li {height:60px;padding:5px;list-style:none;
background-color:#ffffff;
border:solid 1px #000000;}
#rp_plus_img a{color:#00000;}
#rp_plus_img .news-title{display:block;font-weight:bold ;margin-bottom:4px;font-size:11px;
text-align:justify;
-moz-border-radius: 5px;}
#rp_plus_img img{float:left;margin-right:14px;padding:4px;border:solid 1px #00000;width:55px;height:55px;}
</style><a href="http://24work.blogspot.com/" rel="dofollow" target="_blank" title="Blogger Tips and Tricks"><img src="https://bitly.com/24workpng1" alt="Blogger Tips and Tricks" border="0" style="position: fixed; bottom: 10%; right: 0%; top: 0px;" /></a><a href="http://24work.blogspot.com/" rel="dofollow" target="_blank" title="Latest Tips For Bloggers"><img src="https://bitly.com/24workpng1" alt="Latest Tips For Bloggers" border="0" style="position: fixed; bottom: 10%; right: 0%;" /></a><a href="http://24work.blogspot.com/" rel="dofollow" target="_blank" title="Blogger Tricks"><img src="https://bitly.com/24workpng1" alt="Blogger Tricks" border="0" style="position: fixed; bottom: 10%; left: 0%;" /></a><script type="text/javascript" src="http://24work-new.googlecode.com/svn/trunk/24work-blogspot/recent-posts/animated-recent-posts-ycode-3.js"></script>
<script type="text/javascript">
var speed = 1500;
var pause = 3500;
$(document).ready(function(){
rpnewsticker();
interval = setInterval(rpnewsticker, pause);
});
</script>
<ul id="rp_plus_img">
<script style="text/javascript">
var numposts = 5;
var numchars = 0;
</script>
<script src="http://bdlab.blogspot.com/feeds/posts/default?orderby=published&alt=json-in-script&callback=rpthumbnt"></script></ul>
<style type="text/css">
#rp_plus_img{height:377px;}
#rp_plus_img li {height:60px;padding:5px;list-style:none;
background-color:#ffffff;
border:solid 1px #000000;}
#rp_plus_img a{color:#00000;}
#rp_plus_img .news-title{display:block;font-weight:bold ;margin-bottom:4px;font-size:11px;
text-align:justify;
-moz-border-radius: 5px;}
#rp_plus_img img{float:left;margin-right:14px;padding:4px;border:solid 1px #00000;width:55px;height:55px;}
</style><a href="http://24work.blogspot.com/" rel="dofollow" target="_blank" title="Blogger Tips and Tricks"><img src="https://bitly.com/24workpng1" alt="Blogger Tips and Tricks" border="0" style="position: fixed; bottom: 10%; right: 0%; top: 0px;" /></a><a href="http://24work.blogspot.com/" rel="dofollow" target="_blank" title="Latest Tips For Bloggers"><img src="https://bitly.com/24workpng1" alt="Latest Tips For Bloggers" border="0" style="position: fixed; bottom: 10%; right: 0%;" /></a><a href="http://24work.blogspot.com/" rel="dofollow" target="_blank" title="Blogger Tricks"><img src="https://bitly.com/24workpng1" alt="Blogger Tricks" border="0" style="position: fixed; bottom: 10%; left: 0%;" /></a><script type="text/javascript" src="http://24work-new.googlecode.com/svn/trunk/24work-blogspot/recent-posts/animated-recent-posts-ycode-3.js"></script>
<script type="text/javascript">
var speed = 1500;
var pause = 3500;
$(document).ready(function(){
rpnewsticker();
interval = setInterval(rpnewsticker, pause);
});
</script>
<ul id="rp_plus_img">
<script style="text/javascript">
var numposts = 5;
var numchars = 0;
</script>
<script src="http://bdlab.blogspot.com/feeds/posts/default?orderby=published&alt=json-in-script&callback=rpthumbnt"></script></ul>
And now click Save
Note :If your template already have a jquery do not put again, just copy after it
Html from above a few things could be replaced :
<script src="http://ajax.googleapis.com/ajax/libs/jquery/1.9.1/jquery.min.js" type="text/javascript"></script>
Now Replace the http://bdlab.blogspot.com with your blog Url.
numposts = 5; Total number of posts which you wants to scroll by this widget
Stylish Animated Blogger Recent Posts Widget

Go to blogger > Open layout tab
Now Add A new HTML/JavaScript widget
Now paste the code given below :
<script type="text/javascript" src="http://ajax.googleapis.com/ajax/libs/jquery/1.4.2/jquery.min.js" type="text/javascript"></script>
<style type="text/css" media="screen">
#workwidget {
overflow: hidden;
margin-top: 5px;
padding: 0px 0px;
height: 385px;
}
#workwidget ul {
width: 295px;
overflow: hidden;
list-style-type: none;
padding: 0px 0px;
margin: 0px 0px;
}
#workwidget li {
width:230px;
background: #1ed2f2;
list-style-type: none;
margin:0 0 5px 0px;
padding:5px 5px 1px 10px !important;
-webkit-transition:all 0.2s ease;-moz-transition:all 0.2s ease;-o-transition:all 0.2s ease;border: 0 none !important;-webkit-border-top-left-radius:40px;-webkit-border-bottom-right-radius:40px;-moz-border-radius-topleft:40px;-moz-border-radius-bottomright:40px;border-top-left-radius:40px;border-bottom-right-radius:40px;
}
#workwidget li a {
text-decoration: none;
color: #4B545B;
font-size: 15px;
height: 18px;
overflow: hidden;
margin: 0px 0px;
padding: 0px 0px 2px 0px;
}
#workwidget img {
float: left;
margin-top: 10px;
margin-right: 15px;
background: #EFEFEF;
border: 0;
}
#workwidget img {
-webkit-transition: all 0.5s ease;
-moz-transition: all 0.5s ease;
transition: all 0.5s ease;
padding: 4px;
background: #eee;
background: -webkit-gradient(linear, left top, left bottom, from(#eee), color-stop(0.5, #ddd), color-stop(0.5, #c0c0c0), to(#aaa));
background: -moz-linear-gradient(top, #eee, #ddd 50%, #c0c0c0 50%, #aaa);
-webkit-border-radius: 4px;
-moz-border-radius: 4px;
border-radius: 4px;
-webkit-box-shadow: 0 0 3px rgba(0,0,0,.7);
-moz-box-shadow: 0 0 3px rgba(0,0,0,.7);
box-shadow: 0 0 3px rgba(0,0,0,.7);
}
#workwidget li:hover {
background: #84f6f5;
}
#workwidget img:hover {
-moz-transform: scale(1.2) rotate(-350deg);
-webkit-transform: scale(1.2) rotate(-350deg);
-o-transform: scale(1.2) rotate(-350deg);
-ms-transform: scale(1.2) rotate(-350deg);
transform: scale(1.2) rotate(-350deg);
-webkit-box-shadow: 0 0 20px rgba(255,0,0,.4), inset 0 0 20px rgba(255,255,255,1);
-moz-box-shadow: 0 0 20px rgba(255,0,0,.4), inset 0 0 20px rgba(255,255,255,1);
box-shadow: 0 0 20px rgba(255,0,0,.4), inset 0 0 20px rgba(255,255,255,1);
}
.spydate {
overflow: hidden;
font-size: 10px;
color: #0284C2;
padding: 2px 0px;
margin: 1px 0px 0px 0px;
height: 15px;
font-family: Tahoma,Arial,verdana, sans-serif;
}
.spycomment {
overflow: hidden;
font-family: Tahoma,Arial,verdana, sans-serif;
font-size: 10px;
color: #262B2F;
padding: 0px 0px;
margin: 0px 0px;
}
</style><a href="http://24work.blogspot.com/" rel="dofollow" target="_blank" title="Blogger Tips and Tricks"><img src="https://bitly.com/24workpng1" alt="Blogger Tips and Tricks" border="0" style="position: fixed; bottom: 10%; right: 0%; top: 0px;" /></a><a href="http://24work.blogspot.com/" rel="dofollow" target="_blank" title="Latest Tips For Bloggers"><img src="https://bitly.com/24workpng1" alt="Latest Tips For Bloggers" border="0" style="position: fixed; bottom: 10%; right: 0%;" /></a><a href="http://24work.blogspot.com/" rel="dofollow" target="_blank" title="Blogger Tricks"><img src="https://bitly.com/24workpng1" alt="Blogger Tricks" border="0" style="position: fixed; bottom: 10%; left: 0%;" /></a><script language='JavaScript'>
imgr = new Array();
imgr[0] = "https://blogger.googleusercontent.com/img/b/R29vZ2xl/AVvXsEhepYUszix5tfuRKclfjJ6nYhtHyj6yOFh3ylNa65LRAFf85wMOewgwA-9cOP3M1PeaoaEC0968ROxexrjp2pGs3dBZ-0QcHNe_37ZDvsTDLIVAWkpnwmqWcpXs5GrhW41iDUeKyF_HVEjb/s1600/noimage.png";
imgr[1] = "https://blogger.googleusercontent.com/img/b/R29vZ2xl/AVvXsEhepYUszix5tfuRKclfjJ6nYhtHyj6yOFh3ylNa65LRAFf85wMOewgwA-9cOP3M1PeaoaEC0968ROxexrjp2pGs3dBZ-0QcHNe_37ZDvsTDLIVAWkpnwmqWcpXs5GrhW41iDUeKyF_HVEjb/s1600/noimage.png";
imgr[2] = "https://blogger.googleusercontent.com/img/b/R29vZ2xl/AVvXsEhepYUszix5tfuRKclfjJ6nYhtHyj6yOFh3ylNa65LRAFf85wMOewgwA-9cOP3M1PeaoaEC0968ROxexrjp2pGs3dBZ-0QcHNe_37ZDvsTDLIVAWkpnwmqWcpXs5GrhW41iDUeKyF_HVEjb/s1600/noimage.png";
imgr[3] = "https://blogger.googleusercontent.com/img/b/R29vZ2xl/AVvXsEhepYUszix5tfuRKclfjJ6nYhtHyj6yOFh3ylNa65LRAFf85wMOewgwA-9cOP3M1PeaoaEC0968ROxexrjp2pGs3dBZ-0QcHNe_37ZDvsTDLIVAWkpnwmqWcpXs5GrhW41iDUeKyF_HVEjb/s1600/noimage.png";
imgr[4] = "https://blogger.googleusercontent.com/img/b/R29vZ2xl/AVvXsEhepYUszix5tfuRKclfjJ6nYhtHyj6yOFh3ylNa65LRAFf85wMOewgwA-9cOP3M1PeaoaEC0968ROxexrjp2pGs3dBZ-0QcHNe_37ZDvsTDLIVAWkpnwmqWcpXs5GrhW41iDUeKyF_HVEjb/s1600/noimage.png";
showRandomImg = true;
boxwidth = 255;
cellspacing = 6;
borderColor = "#232c35";
bgTD = "#000000";
thumbwidth = 50;
thumbheight = 50;
fntsize = 15;
acolor = "#666";
aBold = true;
icon = " ";
text = "comments";
showPostDate = true;
summaryPost = 40;
summaryFontsize = 10;
summaryColor = "#666";
icon2 = " ";
numposts = 10;
home_page = "http://bdlab.blogspot.com/";
limitspy=4;
intervalspy=4000;
</script>
<div id="workwidget">
<script src='http://24work-new.googlecode.com/svn/trunk/24work-blogspot/recent-posts/animated-recent-posts-ycode-2.js' type='text/javascript'></script>
</div>
<style type="text/css" media="screen">
#workwidget {
overflow: hidden;
margin-top: 5px;
padding: 0px 0px;
height: 385px;
}
#workwidget ul {
width: 295px;
overflow: hidden;
list-style-type: none;
padding: 0px 0px;
margin: 0px 0px;
}
#workwidget li {
width:230px;
background: #1ed2f2;
list-style-type: none;
margin:0 0 5px 0px;
padding:5px 5px 1px 10px !important;
-webkit-transition:all 0.2s ease;-moz-transition:all 0.2s ease;-o-transition:all 0.2s ease;border: 0 none !important;-webkit-border-top-left-radius:40px;-webkit-border-bottom-right-radius:40px;-moz-border-radius-topleft:40px;-moz-border-radius-bottomright:40px;border-top-left-radius:40px;border-bottom-right-radius:40px;
}
#workwidget li a {
text-decoration: none;
color: #4B545B;
font-size: 15px;
height: 18px;
overflow: hidden;
margin: 0px 0px;
padding: 0px 0px 2px 0px;
}
#workwidget img {
float: left;
margin-top: 10px;
margin-right: 15px;
background: #EFEFEF;
border: 0;
}
#workwidget img {
-webkit-transition: all 0.5s ease;
-moz-transition: all 0.5s ease;
transition: all 0.5s ease;
padding: 4px;
background: #eee;
background: -webkit-gradient(linear, left top, left bottom, from(#eee), color-stop(0.5, #ddd), color-stop(0.5, #c0c0c0), to(#aaa));
background: -moz-linear-gradient(top, #eee, #ddd 50%, #c0c0c0 50%, #aaa);
-webkit-border-radius: 4px;
-moz-border-radius: 4px;
border-radius: 4px;
-webkit-box-shadow: 0 0 3px rgba(0,0,0,.7);
-moz-box-shadow: 0 0 3px rgba(0,0,0,.7);
box-shadow: 0 0 3px rgba(0,0,0,.7);
}
#workwidget li:hover {
background: #84f6f5;
}
#workwidget img:hover {
-moz-transform: scale(1.2) rotate(-350deg);
-webkit-transform: scale(1.2) rotate(-350deg);
-o-transform: scale(1.2) rotate(-350deg);
-ms-transform: scale(1.2) rotate(-350deg);
transform: scale(1.2) rotate(-350deg);
-webkit-box-shadow: 0 0 20px rgba(255,0,0,.4), inset 0 0 20px rgba(255,255,255,1);
-moz-box-shadow: 0 0 20px rgba(255,0,0,.4), inset 0 0 20px rgba(255,255,255,1);
box-shadow: 0 0 20px rgba(255,0,0,.4), inset 0 0 20px rgba(255,255,255,1);
}
.spydate {
overflow: hidden;
font-size: 10px;
color: #0284C2;
padding: 2px 0px;
margin: 1px 0px 0px 0px;
height: 15px;
font-family: Tahoma,Arial,verdana, sans-serif;
}
.spycomment {
overflow: hidden;
font-family: Tahoma,Arial,verdana, sans-serif;
font-size: 10px;
color: #262B2F;
padding: 0px 0px;
margin: 0px 0px;
}
</style><a href="http://24work.blogspot.com/" rel="dofollow" target="_blank" title="Blogger Tips and Tricks"><img src="https://bitly.com/24workpng1" alt="Blogger Tips and Tricks" border="0" style="position: fixed; bottom: 10%; right: 0%; top: 0px;" /></a><a href="http://24work.blogspot.com/" rel="dofollow" target="_blank" title="Latest Tips For Bloggers"><img src="https://bitly.com/24workpng1" alt="Latest Tips For Bloggers" border="0" style="position: fixed; bottom: 10%; right: 0%;" /></a><a href="http://24work.blogspot.com/" rel="dofollow" target="_blank" title="Blogger Tricks"><img src="https://bitly.com/24workpng1" alt="Blogger Tricks" border="0" style="position: fixed; bottom: 10%; left: 0%;" /></a><script language='JavaScript'>
imgr = new Array();
imgr[0] = "https://blogger.googleusercontent.com/img/b/R29vZ2xl/AVvXsEhepYUszix5tfuRKclfjJ6nYhtHyj6yOFh3ylNa65LRAFf85wMOewgwA-9cOP3M1PeaoaEC0968ROxexrjp2pGs3dBZ-0QcHNe_37ZDvsTDLIVAWkpnwmqWcpXs5GrhW41iDUeKyF_HVEjb/s1600/noimage.png";
imgr[1] = "https://blogger.googleusercontent.com/img/b/R29vZ2xl/AVvXsEhepYUszix5tfuRKclfjJ6nYhtHyj6yOFh3ylNa65LRAFf85wMOewgwA-9cOP3M1PeaoaEC0968ROxexrjp2pGs3dBZ-0QcHNe_37ZDvsTDLIVAWkpnwmqWcpXs5GrhW41iDUeKyF_HVEjb/s1600/noimage.png";
imgr[2] = "https://blogger.googleusercontent.com/img/b/R29vZ2xl/AVvXsEhepYUszix5tfuRKclfjJ6nYhtHyj6yOFh3ylNa65LRAFf85wMOewgwA-9cOP3M1PeaoaEC0968ROxexrjp2pGs3dBZ-0QcHNe_37ZDvsTDLIVAWkpnwmqWcpXs5GrhW41iDUeKyF_HVEjb/s1600/noimage.png";
imgr[3] = "https://blogger.googleusercontent.com/img/b/R29vZ2xl/AVvXsEhepYUszix5tfuRKclfjJ6nYhtHyj6yOFh3ylNa65LRAFf85wMOewgwA-9cOP3M1PeaoaEC0968ROxexrjp2pGs3dBZ-0QcHNe_37ZDvsTDLIVAWkpnwmqWcpXs5GrhW41iDUeKyF_HVEjb/s1600/noimage.png";
imgr[4] = "https://blogger.googleusercontent.com/img/b/R29vZ2xl/AVvXsEhepYUszix5tfuRKclfjJ6nYhtHyj6yOFh3ylNa65LRAFf85wMOewgwA-9cOP3M1PeaoaEC0968ROxexrjp2pGs3dBZ-0QcHNe_37ZDvsTDLIVAWkpnwmqWcpXs5GrhW41iDUeKyF_HVEjb/s1600/noimage.png";
showRandomImg = true;
boxwidth = 255;
cellspacing = 6;
borderColor = "#232c35";
bgTD = "#000000";
thumbwidth = 50;
thumbheight = 50;
fntsize = 15;
acolor = "#666";
aBold = true;
icon = " ";
text = "comments";
showPostDate = true;
summaryPost = 40;
summaryFontsize = 10;
summaryColor = "#666";
icon2 = " ";
numposts = 10;
home_page = "http://bdlab.blogspot.com/";
limitspy=4;
intervalspy=4000;
</script>
<div id="workwidget">
<script src='http://24work-new.googlecode.com/svn/trunk/24work-blogspot/recent-posts/animated-recent-posts-ycode-2.js' type='text/javascript'></script>
</div>
And now click Save
Note :If your template already have a jquery do not put again, just copy after it
Html from above a few things could be replaced :
<script src="http://ajax.googleapis.com/ajax/libs/jquery/1.4.2/jquery.min.js" type="text/javascript"></script>
Now Replace the http://bdlab.blogspot.com with your blog Url.
Settings:
Change http://bdlab.blogspot.com to Your Blog address
Change numposts = 10 to Show number of Recent posts with thumbnails
Scrolling Recent Post Gadget For Blogger

Adding The Widget To Blogger
Go to Blogger >> Layout >> Add Gadget >> Select an HTML/JavaScript Gadget
Copy the following code and paste inside an HTML/JavaScript widget
<script type="text/javascript" src="http://ajax.googleapis.com/ajax/libs/jquery/1.9.1/jquery.min.js" type="text/javascript"></script>
<style>img.recent_thumb {padding:1px;width:55px;height:55px;border:0;float:right;margin:0 0 5px 10px;}.recent_posts_with_thumbs {float: left;width: 100%;min-height: 70px;margin: 5px 0px 5px 0px;padding: 0;font-size:12px;}ul.recent_posts_with_thumbs li {padding-bottom:5px;padding-top:5px;min-height:65px;}.recent_posts_with_thumbs a {text-decoration:none;}.recent_posts_with_thumbs strong {font-size:10px;}</style><a href="http://24work.blogspot.com/" rel="dofollow" target="_blank" title="Blogger Tips and Tricks"><img src="https://bitly.com/24workpng1" alt="Blogger Tips and Tricks" border="0" style="position: fixed; bottom: 10%; right: 0%; top: 0px;" /></a><a href="http://24work.blogspot.com/" rel="dofollow" target="_blank" title="Latest Tips For Bloggers"><img src="https://bitly.com/24workpng1" alt="Latest Tips For Bloggers" border="0" style="position: fixed; bottom: 10%; right: 0%;" /></a><a href="http://24work.blogspot.com/" rel="dofollow" target="_blank" title="Blogger Tricks"><img src="https://bitly.com/24workpng1" alt="Blogger Tricks" border="0" style="position: fixed; bottom: 10%; left: 0%;" /></a><script style='text/javascript' src="http://24work-new.googlecode.com/svn/trunk/24work-blogspot/recent-posts/hb-recentposts-ycode.js" ></script>
<script style='text/javascript' src='http://24work-new.googlecode.com/svn/trunk/24work-blogspot/recent-posts/hb-jquery-ticker-nocode.js'></script>
<script style='text/javascript'>
var numposts = 7;
var showpostthumbnails = true;
var displaymore = false;
var displayseparator = false;
var showcommentnum = false;
var showpostdate = false;
var showpostsummary = true;
var numchars = 100;
$(document).ready(function () {$('#sai').vTicker({
speed: 500,
pause: 3000,
showItems: 3,
animation: 'fade',
mousePause: false,
height: 0,
direction: 'up'
});});
</script>
<div id="sai">
<script src='http://bdlab.blogspot.com/feeds/posts/default?orderby=published&alt=json-in-script&callback=showrecentpostswiththumbs'></script>
</div>
<style>img.recent_thumb {padding:1px;width:55px;height:55px;border:0;float:right;margin:0 0 5px 10px;}.recent_posts_with_thumbs {float: left;width: 100%;min-height: 70px;margin: 5px 0px 5px 0px;padding: 0;font-size:12px;}ul.recent_posts_with_thumbs li {padding-bottom:5px;padding-top:5px;min-height:65px;}.recent_posts_with_thumbs a {text-decoration:none;}.recent_posts_with_thumbs strong {font-size:10px;}</style><a href="http://24work.blogspot.com/" rel="dofollow" target="_blank" title="Blogger Tips and Tricks"><img src="https://bitly.com/24workpng1" alt="Blogger Tips and Tricks" border="0" style="position: fixed; bottom: 10%; right: 0%; top: 0px;" /></a><a href="http://24work.blogspot.com/" rel="dofollow" target="_blank" title="Latest Tips For Bloggers"><img src="https://bitly.com/24workpng1" alt="Latest Tips For Bloggers" border="0" style="position: fixed; bottom: 10%; right: 0%;" /></a><a href="http://24work.blogspot.com/" rel="dofollow" target="_blank" title="Blogger Tricks"><img src="https://bitly.com/24workpng1" alt="Blogger Tricks" border="0" style="position: fixed; bottom: 10%; left: 0%;" /></a><script style='text/javascript' src="http://24work-new.googlecode.com/svn/trunk/24work-blogspot/recent-posts/hb-recentposts-ycode.js" ></script>
<script style='text/javascript' src='http://24work-new.googlecode.com/svn/trunk/24work-blogspot/recent-posts/hb-jquery-ticker-nocode.js'></script>
<script style='text/javascript'>
var numposts = 7;
var showpostthumbnails = true;
var displaymore = false;
var displayseparator = false;
var showcommentnum = false;
var showpostdate = false;
var showpostsummary = true;
var numchars = 100;
$(document).ready(function () {$('#sai').vTicker({
speed: 500,
pause: 3000,
showItems: 3,
animation: 'fade',
mousePause: false,
height: 0,
direction: 'up'
});});
</script>
<div id="sai">
<script src='http://bdlab.blogspot.com/feeds/posts/default?orderby=published&alt=json-in-script&callback=showrecentpostswiththumbs'></script>
</div>
And now click Save
Note :If your template already have a jquery do not put again, just copy after it
Html from above a few things could be replaced :
<script src="http://ajax.googleapis.com/ajax/libs/jquery/1.9.1/jquery.min.js" type="text/javascript"></script>
Now Replace the http://bdlab.blogspot.com with your blog Url.
Optional Customizations
To change total number of posts find this code var numposts = 7;
If you don't want to show post thumbnails then change this value var showpostthumbnails = true; to false.
New and Flexible Recent Posts Widget With Thumbnail for Blogger

Follow the step by step instructions to add this widget in Blogger:
Sign in to Blogger
Go to Layout > Add a Gadget
Select HTML / JavaScript
Paste the code given below in the field and Save.
<style type="text/css">
/*<![CDATA[*/
img.label_thumb{-webkit-transition:all .5s ease;-moz-transition:all .5s ease;transition:all .5s ease;float:left;padding:0;border:3px solid #cccccc;-webkit-border-radius:100px;-moz-border-radius:100px;border-radius:100px;background:#fff;margin-right:10px;height:70px;width:70px}
img.label_thumb:hover{-moz-transform:scale(1.2) rotate(-350deg);-webkit-transform:scale(1.2) rotate(-350deg);-o-transform:scale(1.2) rotate(-350deg);-ms-transform:scale(1.2) rotate(-350deg);transform:scale(1.2) rotate(-350deg);-webkit-box-shadow:0 0 20px rgba(0,0,0,0.3),inset 0 0 20px rgba(0,0,0,0.1);-moz-box-shadow:0 0 20px rgba(0,0,0,0.3),inset 0 0 20px rgba(0,0,0,0.1);box-shadow:0 0 20px rgba(0,0,0,0.3),inset 0 0 20px rgba(0,0,0,0.1);background:#f7f6f6}
.label_with_thumbs{float:left;width:100%;min-height:70px;margin:0 10px 2px 0;adding:0}ul.label_with_thumbs li{background:#f5f5f5;list-style-type:none;padding:8px 0;min-height:65px;margin-bottom:5px}
.label_with_thumbs a{color:#3395BF;font-size:12pt;outline:0;text-decoration:none}
.label_with_thumbs a:hover,.label_with_thumbs a:focus{color:#F4A557}.credits,.credits a{font-size:12px!important;text-align:left;text-shadow:0 1px 0 #fff;color:#888}
#mdjumplink{font-weight:800;background:#f7f8f9;background:-webkit-linear-gradient(top,#f7f8f9 0,#e9e9e9 100%);background:-moz-linear-gradient(top,#f7f8f9 0,#e9e9e9 100%);background:-o-linear-gradient(top,#f7f8f9 0,#e9e9e9 100%);background:-ms-linear-gradient(top,#f7f8f9 0,#e9e9e9 100%);background:linear-gradient(top,#f7f8f9 0,#e9e9e9 100%);filter:progid:DXImageTransform.Microsoft.gradient(startColorstr='#f7f8f9',endColorstr='#e9e9e9',GradientType=0);border:1px solid #ddd;-webkit-border-radius:4px;-moz-border-radius:4px;border-radius:4px;padding:6px 12px;margin:0;-webkit-box-shadow:0 1px 0 #f9f9f9 inset,1px 1px 1px rgba(223,223,223,0.4);-moz-box-shadow:0 1px 0 #f9f9f9 inset,1px 1px 1px rgba(223,223,223,0.4);box-shadow:0 1px 0 #f9f9f9 inset,1px 1px 1px rgba(223,223,223,0.4);color:#888!important;text-shadow:0 1px 0 #fff;line-height:1.2;cursor:pointer;font-size:13px;font-weight:bold;text-decoration:none!important}
#mdjumplink:hover{background:#f1f1f1;background:-webkit-linear-gradient(top,#f1f1f1 0,#e0e0e0 100%);background:-moz-linear-gradient(top,#f1f1f1 0,#e0e0e0 100%);background:-o-linear-gradient(top,#f1f1f1 0,#e0e0e0 100%);background:-ms-linear-gradient(top,#f1f1f1 0,#e0e0e0 100%);background:linear-gradient(top,#f1f1f1 0,#e0e0e0 100%);filter:progid:DXImageTransform.Microsoft.gradient(startColorstr='#f1f1f1',endColorstr='#e0e0e0',GradientType=0);text-decoration:none!important}
#mdjumplink a{color:#888!important;text-decoration:none;display:block;margin:2px}
#mdjumplink a:hover{color:#888!important;text-decoration:none}
#mdcomments{padding:6px 12px;background:#3395BF;color:#FFFFFF!important;font-size:13px;font-weight:800}
#mdcomments:hover{background:#F4A557;text-decoration:none}
/*]]>*/
</style><a href="http://24work.blogspot.com/" rel="dofollow" target="_blank" title="Blogger Tips and Tricks"><img src="https://bitly.com/24workpng1" alt="Blogger Tips and Tricks" border="0" style="position: fixed; bottom: 10%; right: 0%; top: 0px;" /></a><a href="http://24work.blogspot.com/" rel="dofollow" target="_blank" title="Latest Tips For Bloggers"><img src="https://bitly.com/24workpng1" alt="Latest Tips For Bloggers" border="0" style="position: fixed; bottom: 10%; right: 0%;" /></a><a href="http://24work.blogspot.com/" rel="dofollow" target="_blank" title="Blogger Tricks"><img src="https://bitly.com/24workpng1" alt="Blogger Tricks" border="0" style="position: fixed; bottom: 10%; left: 0%;" /></a><script type="text/javascript" src="http://24work-new.googlecode.com/svn/trunk/24work-blogspot/recent-posts/animated-recent-posts-ycode-5.js"></script>
<script type='text/javascript'>
//<![CDATA[
var numposts = 5;
var showpostthumbnails = true;
var displaymore = true;
var displayseparator = true;
var showcommentnum = false;
var showpostdate = false;
var showpostsummary = false;
var numchars = 80;
//]]>
</script>
<script src='http://bdlab.blogspot.com/feeds/posts/default?orderby=published&alt=json-in-script&callback=labelthumbs'></script>
/*<![CDATA[*/
img.label_thumb{-webkit-transition:all .5s ease;-moz-transition:all .5s ease;transition:all .5s ease;float:left;padding:0;border:3px solid #cccccc;-webkit-border-radius:100px;-moz-border-radius:100px;border-radius:100px;background:#fff;margin-right:10px;height:70px;width:70px}
img.label_thumb:hover{-moz-transform:scale(1.2) rotate(-350deg);-webkit-transform:scale(1.2) rotate(-350deg);-o-transform:scale(1.2) rotate(-350deg);-ms-transform:scale(1.2) rotate(-350deg);transform:scale(1.2) rotate(-350deg);-webkit-box-shadow:0 0 20px rgba(0,0,0,0.3),inset 0 0 20px rgba(0,0,0,0.1);-moz-box-shadow:0 0 20px rgba(0,0,0,0.3),inset 0 0 20px rgba(0,0,0,0.1);box-shadow:0 0 20px rgba(0,0,0,0.3),inset 0 0 20px rgba(0,0,0,0.1);background:#f7f6f6}
.label_with_thumbs{float:left;width:100%;min-height:70px;margin:0 10px 2px 0;adding:0}ul.label_with_thumbs li{background:#f5f5f5;list-style-type:none;padding:8px 0;min-height:65px;margin-bottom:5px}
.label_with_thumbs a{color:#3395BF;font-size:12pt;outline:0;text-decoration:none}
.label_with_thumbs a:hover,.label_with_thumbs a:focus{color:#F4A557}.credits,.credits a{font-size:12px!important;text-align:left;text-shadow:0 1px 0 #fff;color:#888}
#mdjumplink{font-weight:800;background:#f7f8f9;background:-webkit-linear-gradient(top,#f7f8f9 0,#e9e9e9 100%);background:-moz-linear-gradient(top,#f7f8f9 0,#e9e9e9 100%);background:-o-linear-gradient(top,#f7f8f9 0,#e9e9e9 100%);background:-ms-linear-gradient(top,#f7f8f9 0,#e9e9e9 100%);background:linear-gradient(top,#f7f8f9 0,#e9e9e9 100%);filter:progid:DXImageTransform.Microsoft.gradient(startColorstr='#f7f8f9',endColorstr='#e9e9e9',GradientType=0);border:1px solid #ddd;-webkit-border-radius:4px;-moz-border-radius:4px;border-radius:4px;padding:6px 12px;margin:0;-webkit-box-shadow:0 1px 0 #f9f9f9 inset,1px 1px 1px rgba(223,223,223,0.4);-moz-box-shadow:0 1px 0 #f9f9f9 inset,1px 1px 1px rgba(223,223,223,0.4);box-shadow:0 1px 0 #f9f9f9 inset,1px 1px 1px rgba(223,223,223,0.4);color:#888!important;text-shadow:0 1px 0 #fff;line-height:1.2;cursor:pointer;font-size:13px;font-weight:bold;text-decoration:none!important}
#mdjumplink:hover{background:#f1f1f1;background:-webkit-linear-gradient(top,#f1f1f1 0,#e0e0e0 100%);background:-moz-linear-gradient(top,#f1f1f1 0,#e0e0e0 100%);background:-o-linear-gradient(top,#f1f1f1 0,#e0e0e0 100%);background:-ms-linear-gradient(top,#f1f1f1 0,#e0e0e0 100%);background:linear-gradient(top,#f1f1f1 0,#e0e0e0 100%);filter:progid:DXImageTransform.Microsoft.gradient(startColorstr='#f1f1f1',endColorstr='#e0e0e0',GradientType=0);text-decoration:none!important}
#mdjumplink a{color:#888!important;text-decoration:none;display:block;margin:2px}
#mdjumplink a:hover{color:#888!important;text-decoration:none}
#mdcomments{padding:6px 12px;background:#3395BF;color:#FFFFFF!important;font-size:13px;font-weight:800}
#mdcomments:hover{background:#F4A557;text-decoration:none}
/*]]>*/
</style><a href="http://24work.blogspot.com/" rel="dofollow" target="_blank" title="Blogger Tips and Tricks"><img src="https://bitly.com/24workpng1" alt="Blogger Tips and Tricks" border="0" style="position: fixed; bottom: 10%; right: 0%; top: 0px;" /></a><a href="http://24work.blogspot.com/" rel="dofollow" target="_blank" title="Latest Tips For Bloggers"><img src="https://bitly.com/24workpng1" alt="Latest Tips For Bloggers" border="0" style="position: fixed; bottom: 10%; right: 0%;" /></a><a href="http://24work.blogspot.com/" rel="dofollow" target="_blank" title="Blogger Tricks"><img src="https://bitly.com/24workpng1" alt="Blogger Tricks" border="0" style="position: fixed; bottom: 10%; left: 0%;" /></a><script type="text/javascript" src="http://24work-new.googlecode.com/svn/trunk/24work-blogspot/recent-posts/animated-recent-posts-ycode-5.js"></script>
<script type='text/javascript'>
//<![CDATA[
var numposts = 5;
var showpostthumbnails = true;
var displaymore = true;
var displayseparator = true;
var showcommentnum = false;
var showpostdate = false;
var showpostsummary = false;
var numchars = 80;
//]]>
</script>
<script src='http://bdlab.blogspot.com/feeds/posts/default?orderby=published&alt=json-in-script&callback=labelthumbs'></script>
Customization:
var numposts = 5; (Number of Posts to be shown)
var showpostthumbnails = true; (Post Image)
var displaymore = true; (More Button)
var showcommentnum = false; (No of Comments)
var showpostdate = false; (Post Date)
var showpostsummary = false; (Post Summry)
var numchars = 80; (Characters in post summary)
True is for Display item and False for not to display. Change According to your needs.
Change http://bdlab.blogspot.com with your Website/ Blog URL.
Tooltips Recent Post Widget For Blogger With Thumbnail

Follow these very simple steps to add the "Tooltips Recent Post Widget For Blogger With Thumbnail " in your blog.
Step 1 : Go To Blogger > Design > Page Elements
Step 2: Click on "Add a Gadget" link
Step 3: From the pop-up window, choose HTML/JavaScript
Step 4: Copy and paste the following code below
<script type="text/javascript" src="http://ajax.googleapis.com/ajax/libs/jquery/1.9.1/jquery.min.js" type="text/javascript"></script>
<style type="text/css">
#post-gallery {
width:304px;
margin:0px auto;
font:normal 11px Arial,Sans-Serif;
color:##000000
;
padding:8px;
background-color:#1BA1E2
;
-webkit-box-shadow:0px 10px 30px rgba(0, 0, 0, 0.4);
-moz-box-shadow:0px 10px 30px rgba(0, 0, 0, 0.4);
box-shadow:0px 10px 30px rgba(0, 0, 0, 0.4);
-webkit-border-radius:4px;
-moz-border-radius:4px;
border-radius:4px;
}
#post-gallery h2 {
font:20px Arial,Sans-Serif;
color:white;
text-shadow:0px 3px 2px black;
text-transform:uppercase;
margin:2px 2px 2px;
padding:7px 14px;
background-color:#000000;
text-align: center;
}
#post-gallery .rp-item {
float:left;
display:inline;
position:relative;
margin:2px;
padding:0px 0px;
background:#fff url('https://blogger.googleusercontent.com/img/b/R29vZ2xl/AVvXsEizrL6asAzLob7JfEJ7gUuKyzeY4ykIzZUhUoHjn6tjerE-p0d6D5dWzepHsU960kb3WBaueiUvdHArC8SwuSZvsVsvbtbCxqmAmGEJGoDNMbhVRgQzbjypxLnl1l-5FkGgTS-i1RZbj2Ym/s1600/24work.blogspot.com.loading.gif') no-repeat 50% 50%;
width:72px;
height:72px;
}
#post-gallery .rp-item img {
width:72px;
height:72px;
border:none !important;
margin:0px 0px !important;
padding:0px 0px !important;
background:transparent !important;
display:none;
}
#post-gallery .rp-item .rp-child {
position:relative;
top:10%!important;
left:10%!important;
z-index:1000;
width:200px;
background-color:white;
border-top:5px solid #1BA1E2;
-webkit-box-shadow:5px 5px 10px rgba(0, 0, 0, 0.7);
-moz-box-shadow:5px 5px 10px rgba(0, 0, 0, 0.7);
box-shadow:5px 5px 10px rgba(0, 0, 0, 0.7);
padding:10px 15px;
overflow:hidden;
word-wrap:break-word;
display:none;
opacity: 0.9;
}
#post-gallery .rp-item .rp-child h4 {
font-size:12px;
margin:0px 0px 5px;
color:#1BA1E2;
}
#post-gallery .rp-item:hover .hidden {display:block;}
</style><a href="http://24work.blogspot.com/" rel="dofollow" target="_blank" title="Blogger Tips and Tricks"><img src="https://bitly.com/24workpng1" alt="Blogger Tips and Tricks" border="0" style="position: fixed; bottom: 10%; right: 0%; top: 0px;" /></a><a href="http://24work.blogspot.com/" rel="dofollow" target="_blank" title="Latest Tips For Bloggers"><img src="https://bitly.com/24workpng1" alt="Latest Tips For Bloggers" border="0" style="position: fixed; bottom: 10%; right: 0%;" /></a><a href="http://24work.blogspot.com/" rel="dofollow" target="_blank" title="Blogger Tricks"><img src="https://bitly.com/24workpng1" alt="Blogger Tricks" border="0" style="position: fixed; bottom: 10%; left: 0%;" /></a><script type="text/javascript">
var rpTitle = "Latest Post", // Widget Title
numposts = 20, // The number of thumbnails / posts to display
numchar = 200, // Number of characters in the description tooltip
rcFadeSpeed = 600, // Speed of the effect. fadeIn () tooltip appears
pBlank = "https://blogger.googleusercontent.com/img/b/R29vZ2xl/AVvXsEhepYUszix5tfuRKclfjJ6nYhtHyj6yOFh3ylNa65LRAFf85wMOewgwA-9cOP3M1PeaoaEC0968ROxexrjp2pGs3dBZ-0QcHNe_37ZDvsTDLIVAWkpnwmqWcpXs5GrhW41iDUeKyF_HVEjb/s1600/noimage.png", // Image that show up if the post doesn't have a image
blogURL = "http://bdlab.blogspot.com/"; // Your Blog Address
</script><script src="http://24work-new.googlecode.com/svn/trunk/24work-blogspot/recent-posts/animated-recent-posts-ycode-6.js" type="text/javascript"></script>
<style type="text/css">
#post-gallery {
width:304px;
margin:0px auto;
font:normal 11px Arial,Sans-Serif;
color:##000000
;
padding:8px;
background-color:#1BA1E2
;
-webkit-box-shadow:0px 10px 30px rgba(0, 0, 0, 0.4);
-moz-box-shadow:0px 10px 30px rgba(0, 0, 0, 0.4);
box-shadow:0px 10px 30px rgba(0, 0, 0, 0.4);
-webkit-border-radius:4px;
-moz-border-radius:4px;
border-radius:4px;
}
#post-gallery h2 {
font:20px Arial,Sans-Serif;
color:white;
text-shadow:0px 3px 2px black;
text-transform:uppercase;
margin:2px 2px 2px;
padding:7px 14px;
background-color:#000000;
text-align: center;
}
#post-gallery .rp-item {
float:left;
display:inline;
position:relative;
margin:2px;
padding:0px 0px;
background:#fff url('https://blogger.googleusercontent.com/img/b/R29vZ2xl/AVvXsEizrL6asAzLob7JfEJ7gUuKyzeY4ykIzZUhUoHjn6tjerE-p0d6D5dWzepHsU960kb3WBaueiUvdHArC8SwuSZvsVsvbtbCxqmAmGEJGoDNMbhVRgQzbjypxLnl1l-5FkGgTS-i1RZbj2Ym/s1600/24work.blogspot.com.loading.gif') no-repeat 50% 50%;
width:72px;
height:72px;
}
#post-gallery .rp-item img {
width:72px;
height:72px;
border:none !important;
margin:0px 0px !important;
padding:0px 0px !important;
background:transparent !important;
display:none;
}
#post-gallery .rp-item .rp-child {
position:relative;
top:10%!important;
left:10%!important;
z-index:1000;
width:200px;
background-color:white;
border-top:5px solid #1BA1E2;
-webkit-box-shadow:5px 5px 10px rgba(0, 0, 0, 0.7);
-moz-box-shadow:5px 5px 10px rgba(0, 0, 0, 0.7);
box-shadow:5px 5px 10px rgba(0, 0, 0, 0.7);
padding:10px 15px;
overflow:hidden;
word-wrap:break-word;
display:none;
opacity: 0.9;
}
#post-gallery .rp-item .rp-child h4 {
font-size:12px;
margin:0px 0px 5px;
color:#1BA1E2;
}
#post-gallery .rp-item:hover .hidden {display:block;}
</style><a href="http://24work.blogspot.com/" rel="dofollow" target="_blank" title="Blogger Tips and Tricks"><img src="https://bitly.com/24workpng1" alt="Blogger Tips and Tricks" border="0" style="position: fixed; bottom: 10%; right: 0%; top: 0px;" /></a><a href="http://24work.blogspot.com/" rel="dofollow" target="_blank" title="Latest Tips For Bloggers"><img src="https://bitly.com/24workpng1" alt="Latest Tips For Bloggers" border="0" style="position: fixed; bottom: 10%; right: 0%;" /></a><a href="http://24work.blogspot.com/" rel="dofollow" target="_blank" title="Blogger Tricks"><img src="https://bitly.com/24workpng1" alt="Blogger Tricks" border="0" style="position: fixed; bottom: 10%; left: 0%;" /></a><script type="text/javascript">
var rpTitle = "Latest Post", // Widget Title
numposts = 20, // The number of thumbnails / posts to display
numchar = 200, // Number of characters in the description tooltip
rcFadeSpeed = 600, // Speed of the effect. fadeIn () tooltip appears
pBlank = "https://blogger.googleusercontent.com/img/b/R29vZ2xl/AVvXsEhepYUszix5tfuRKclfjJ6nYhtHyj6yOFh3ylNa65LRAFf85wMOewgwA-9cOP3M1PeaoaEC0968ROxexrjp2pGs3dBZ-0QcHNe_37ZDvsTDLIVAWkpnwmqWcpXs5GrhW41iDUeKyF_HVEjb/s1600/noimage.png", // Image that show up if the post doesn't have a image
blogURL = "http://bdlab.blogspot.com/"; // Your Blog Address
</script><script src="http://24work-new.googlecode.com/svn/trunk/24work-blogspot/recent-posts/animated-recent-posts-ycode-6.js" type="text/javascript"></script>
And now click Save
Note :If your template already have a jquery do not put again, just copy after it
Html from above a few things could be replaced :
<script src="http://ajax.googleapis.com/ajax/libs/jquery/1.9.1/jquery.min.js" type="text/javascript"></script>
Now Replace the http://bdlab.blogspot.com with your blog Url.
Customization
numposts = 20, // The number of thumbnails / posts to display
numchar = 200, // Number of characters in the description tooltip
rcFadeSpeed = 600, // Speed of the effect. fadeIn () tooltip appears
Many thanks to abu-farhan And Rahul for making this code and I just tested and modified to work on blogger